The Problem
In a production environment, you might have hundreds or even thousands of machines to log into. Manually adding users, setting permissions, and tweaking configs on each box? Yikes.
For two machines that might be okay, but for hundreds? No bueno.
For homelabers, you probably don’t have hundreds of different machines, but you still may have a few dozen different virtual machines that you want to synchronize logins on. If you’re already running Authentik, you already have everything you need to setup single sign on for all of your servers.
This guide will show you how to setup single sign on for all of your linux machines using Authentik and LDAP (using nslcd on the client side). This will allow you to use a single username and password to login to all of your machines. We’ll also be setting up a sudoers file to allow for easy group based administration of the machines (yes, you can also use LDAP to manage your sudoers file, but that’s for another guide).
The High-Level Plan
- Setting up the Authentik LDAP Provider
- Create the outpost
- Add the outpost to your docker compose file
- Create the Linux User Group
- Clone my linux-sso repository
- Copy the example config files and adjust them to your needs
- Manually apply the config files to your first machine (don’t worry, we’ll automate this later)
- Test that you can login to your first machine
- Automate with Ansible
- Profit
Prerequisites
- A working Authentik instance running on docker
- A domain that you own or have access to
- Administrator access to the machines you want to apply SSO to
- A working knowledge of git and the command line
If you don’t have Authentik running and are interested in setting up SSO for not just your linux logins but for your websites as well, then check out Christian Lempa’s guide for installing and configuring Authentik here.
Step 1: Setting up the Authentik LDAP Provider
Step 1.1: Add an LDAP service account
- Navigate to the authentik admin interface
- On the sidebar, navigate to
Directory>Users - Click
Create Service Account - Set the
UsernametoLDAPServiceAccount - Disable the checkboxes for
Create GroupandExpiring - Click
Create - Select the
LDAPServiceAccountuser you just created - Click
Set Password - Enter a password for the account
- Click
Update Password
Step 1.2: Create an LDAP Authentication Flow
Step 1.2.1: Add the password stage
- On the sidebar, navigate to
Flows and Stages>Stages - Click
Create - Select
password-stage - Enter
ldap-password-stageas theName - Under the
Stage-specific settingssection, setBackendsto the following:User database + standard passwordenabledUser database + app passwordsenabledUser database + LDAP passwordenabledUser database + Kerberos passworddisabled
- For
Configuration flow, selectdefault-password-change (Change Password) - For
Failed attempts before cancel, enter5 - Click
Create
Step 1.2.2: Create the Flow
- On the sidebar, navigate to
Flows and Stages>Flows - Click
Create - Enter
ldap-authentication-flowas theName,title, andslug - For
Designation, selectAuthentication - For
Authentication, selectNo requirement - Expand the
Advancedsection - Set
Compatibility Modeto enabled - For
Denied Action, selectMESSAGE_CONTINUE - Click
Create
Step 1.2.3: Bind the stages to the flow
- Click on the flow you just created
- Click
Stage Bindings - Click
Create and bind Stage - Select
Identification Stageas theStage - Set
Nametoldap-identification-stage - Under
Stage-specific settings, enableUsernameandEmailas theUser Fields - Set
Password Stagetoldap-password-stage - Enable the following options:
Case insensitive matchingPretend user existsShow matched user
- Click
Next - Set
Orderto 10 - Click
Create - Create another stage with
Create and bind stage - Select
User Login Stageas theStage - Set the
Nametoldap-authentication-login - Set
Session durationtoseconds=0 - Set
Stay signed in offsettoseconds=0 - For
Network binding, selectBind ASN - for
GeoIP binding, selectBind Continent(or another option if you want to be more specific) - Click
Next - Set
Orderto 30 - Disable
Evaluate when flow is planned - Enable
Evaluate when stage is run - For
Invalid response behavior, selectRETRY - Click
Create
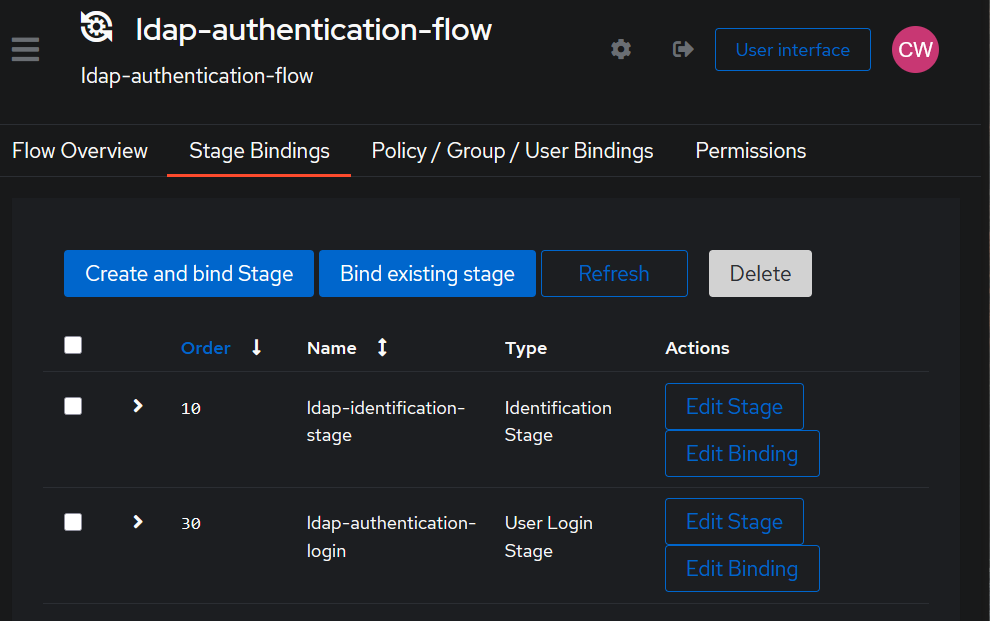
Your flow should look like this:
Step 1.4: Add an LDAP Application and Provider
- On the sidebar, navigate to
Applications>Applications - Click
Create with Provider - Enter
LDAPas theNameandldapas theSlug - Click
Next - Select
LDAP Provideras theProvider - Click
Next - Set
Bind ModetoCached Binding(this will speed up the binding process significantly) - Set
Search ModetoCached querying - For
Bind Flow, selectldap-authentication-flow - For
Unbind Flow, selectdefault-provider-invalidation-flow - For
Base DN, enter the following and substitute your own values:DC=ldap,DC=example,DC=com - For
Certificate, either selectauthentik Self-signed Certificateor select your own certificate if you have one already configured - If you need to set the range for UID numbers, set them now
- Click
Create
Step 2: Create the outpost
- On the sidebar, navigate to
Applications>Outposts - Click
Create - Enter a name for the outpost, for example
LDAP - For
Type, selectLDAP - Select
Local Docker connectionas theIntegration - Select the
LDAPapplication you created in Step 1.4 - Click
Create - On the outposts page, click
View Deployment Infonext to the outpost you just created - Make a note of the
AUTHENTIK_HOSTandAUTHENTIK_INSECUREvalues as you will need them in the next step - Also click
Click to copy tokenunderAUTHENTIK_TOKENand save it as you will need it in the next step - Click
Close
Step 3: Add the outpost to your docker compose file
- Navigate to the directory containing your authentik docker compose file
- Open the
docker-compose.ymlfile - Add the following to the
servicessection:
  authentik_ldap:
    image: ghcr.io/goauthentik/ldap:latest
    # Optionally specify which networks the container should be
    # might be needed to reach the core authentik server
    # networks:
    #   - foo
    ports:
      - 389:3389
      - 636:6636
    environment:
      AUTHENTIK_HOST: <your-authentik-host>
      AUTHENTIK_INSECURE: <true-or-false>
      AUTHENTIK_TOKEN: <your-authentik-token>
- Save the file and restart your docker compose stack with
docker compose up -d
Step 4: Create the Linux User Group
- On the sidebar, navigate to
Directory>Groups - Click
Create - Enter a name for the group, for example
linux-users - Under
Attributes, add the following (replacing the existing{}):loginShell: /bin/bash(or whatever default shell you want to use)
- Click
Create - Click on the group you just created
- Click
Users - Add existing users or create new users that you want to be able to login to the linux machines
Step 5: Clone my linux-sso Repository
git clone https://github.com/LordHerdier/ansible-ldap.git
cd ansible-ldap
This repo contains:
ansible.cfg.example(template for your Ansible config)inventory.example(sample inventory with host groups)playbook-ldap-setup.yml(client-side LDAP setup)playbook-site-sudoers.yml(deploys our standardized sudoers file)templates/site-sudoers.j2.example(Jinja2 template for sudoers)files/:common-accountcommon-authcommon-sessionnslcd.confnsswitch.conf
Step 6: Copy and Customize the Example Config Files
Inside ansible-ldap/files/, you’ll find example versions of the PAM and NSS configs. Copy them into place and tweak as needed:
cp ansible.cfg.example ansible.cfg
cp inventory.example inventory
6.1: nslcd.conf
Open nslcd.conf and set:
uri ldap://<your-authentik-host>→ your LDAP host (orldaps://if you’re feeling secure).base DC=ldap,DC=example,DC=com→ your own Base DN.binddn cn=<Your LDAP Service Account>,ou=users,dc=ldap,dc=example,dc=com→ the service account you created earlier.bindpw <Your LDAP Service Account Password>→ set it to the Authentik service account’s password (or better yet, use abindpwfile).- Adjust the
filter passwdso that only members ofcn=<Your Linux User Group>,ou=groups,dc=ldap,dc=example,dc=comcan log in.
6.2: nsswitch.conf
Ensure lines like these exist so files, systemd, and ldap can all provide user/group information:
passwd:         files systemd ldap
group:          files systemd ldap
shadow:         files systemd ldap
hosts:          files dns ldap
(You can drop in the rest of the file from the example if you want mirror behavior for services, protocols, etc.)
6.3: common-*.d (PAM configs)
In common-account, common-auth, and common-session, we basically punch in the pam_ldap.so lines so that PAM consults LDAP after files. A minimal example in common-auth might be:
# /etc/pam.d/common-auth
auth    [success=1 default=ignore]    pam_unix.so nullok_secure
auth    requisite                     pam_ldap.so use_first_pass
auth    required                      pam_deny.so
In common-account:
# /etc/pam.d/common-account
account [success=1 new_authtok_reqd=done default=ignore] pam_unix.so
account requisite                              pam_ldap.so
account required                               pam_deny.so
And in common-session:
# /etc/pam.d/common-session
session required   pam_unix.so
session optional   pam_ldap.so
(If your distribution’s default PAM layout differs, drop these lines into the right spots; just be sure to merge rather than wipe out everything.) If you’re not confident about the PAM configs, you can use the ones from the example file. They’re the same ones I used for my own setup. Do note that they’re pulled from a Debian 12 machine.
6.4: site-sudoers.j2
This Jinja2 template is what the sudo playbook uses. Populate your user and host aliases. Feel free to add or remove whatever you need. The example in the repo includes sensible defaults.
It should end up looking something like this:
# /etc/sudoers.d/site_sudoers (auto-generated from Jinja2)
Defaults        env_reset
Defaults        secure_path="/usr/local/sbin:/usr/local/bin:/usr/sbin:/usr/bin:/sbin:/bin"
Defaults        passwd_tries=3
Defaults        logfile="/var/log/sudo.log"
Defaults        log_input,log_output

User_Alias      ITADMINS    = alice, bob, carol
User_Alias      DEVELS      = dev1, dev2

Host_Alias      PROXMOXSERVERS = pve1, pve2
Host_Alias      NETSERVERS     = dns1, vpn1, proxy1
Host_Alias      GAMESERVERS    = game1, game2
Host_Alias      DEVERS         = dev1, dev2, dev3

Cmnd_Alias      PKG_MGMT     = /usr/bin/apt*, /usr/bin/yum*, /usr/bin/dnf*
Cmnd_Alias      SERVICE      = /usr/bin/systemctl*, /usr/bin/service*
Cmnd_Alias      NET_TOOLS    = /usr/bin/ifconfig*, /usr/bin/ip*, /usr/bin/ss*, /usr/bin/netstat*
Cmnd_Alias      LOGS         = /usr/bin/journalctl*, /usr/bin/tail*, /usr/bin/less*
Cmnd_Alias      DOCKER       = /usr/bin/docker*
Cmnd_Alias      SENSITIVE    = /usr/bin/passwd, /usr/bin/su, /usr/bin/ssh-keygen

ITADMINS ALL = (ALL) ALL
DEVELS   NETSERVERS = (ALL) NOPASSWD: SERVICE, LOGS
DEVELS   GAMESERVERS = (ALL) NOPASSWD: LOGS
Adapt user and host aliases to reflect your real server names and admin/dev accounts.
Step 7: Manually Apply to Your First Machine
Okay, so far we’ve set up Authentik, created an LDAP service account, configured an outpost, and cloned the repo with all the configs. Now let’s test this on one box before rolling it out.
Warning: This will overwrite critical system files. Back them up first. You have been warned.
-
SSH to your target (e.g.,
linux-test1).ssh root@linux-test1You may also want to copy your SSH key to the target machine if you haven’t already.
ssh-copy-id root@linux-test1 -
Install the needed packages (Debian/Ubuntu example):
apt update
apt install -y libnss-ldapd libpam-ldapd nslcd
The installer might prompt for LDAP URIs, base DN, etc. You can skip those interactive prompts because we’re going to replace them with our config files. If you’re feeling masochistic, fill them out exactly like your
nslcd.confandnsswitch.conf. -
Backup existing config files:
for f in /etc/nslcd.conf /etc/nsswitch.conf /etc/pam.d/{common-account,common-auth,common-session}; do cp "$f" "${f}.bak.$(date +%F_%T)" done -
Copy over the custom configs (from the Ansible repo’s
files/directory):# On your local machine: scp ansible-ldap/files/nslcd.conf root@linux-test1:/etc/nslcd.conf scp ansible-ldap/files/nsswitch.conf root@linux-test1:/etc/nsswitch.conf scp ansible-ldap/files/common-account root@linux-test1:/etc/pam.d/common-account scp ansible-ldap/files/common-auth root@linux-test1:/etc/pam.d/common-auth scp ansible-ldap/files/common-session root@linux-test1:/etc/pam.d/common-session -
Restart
nslcdand make sure it’s running:systemctl restart nslcd systemctl status nslcdIf it’s unhappy, check
/var/log/syslog(orjournalctl -u nslcd) for hints. Common pitfalls include:- Wrong
binddn/bindpw. base DNthat doesn’t match your Authentik LDAP structure.- A firewall blocking port 389/636.
- Wrong
-
Test LDAP connectivity:
getent passwdYou should see local users and any users in the
linux-usersgroup from Authentik. Ifgetent passwdhangs or throws errors, fix that before proceeding. -
Deploy the sudoers file so that your LDAP users can get sudo privileges (if you want to try this now):
mkdir -p /etc/sudoers.d
scp ansible-ldap/templates/site-sudoers.j2 root@linux-test1:/tmp/site-sudoers.j2
apt install -y python3-jinja2 sudo
python3 -c "import jinja2, sys; print(jinja2.Template(open('/tmp/site-sudoers.j2').read()).render())" > /etc/sudoers.d/site_sudoers
chmod 0440 /etc/sudoers.d/site_sudoers
visudo -c
(Yeah, this is basically what the Ansible playbook will do for you later.)
Step 8: Test Your First Machine
-
Log out of your root session:
exit -
SSH in as an LDAP user (e.g.,
bob@linux-test1):ssh bob@linux-test1If everything worked, you should land in a shell prompt as
bob. Sweet relief. -
Try sudo (if you put
bobin thelinux-usersgroup and updated your sudoers template so thatITADMINSor a development alias includesbob):sudo -l sudo whoamiIf that’s all clean, you have successfully logged in and elevated privileges using LDAP credentials. Take a shot of your favorite beverage (responsibly).
Step 9: Automate with Ansible
Now comes the part where you stop doing all these copy-and-pastes and shout curses at SSH.
-
Install Ansible (if you haven’t already)
First, install pipx to actually install ansible.
sudo apt update
sudo apt install pipx
pipx ensurepath
sudo pipx ensurepath --global # optional to allow pipx actions with --global argument
Then, install ansible.
pipx install --include-deps ansible -
Customize
ansible.cfg(in the clonedansible-ldapdirectory):[defaults] inventory = ./inventory private_key_file = ~/.ssh/id_ed25519 # or whatever key you already loaded host_key_checking = False -
Edit
inventory(formerlyinventory.example) to list your hosts, separated by groups. For example:[netservers] linux-test1 ansible_host=192.168.1.10 linux-test2 ansible_host=192.168.1.11 [devservers] dev-01 ansible_host=192.168.1.20 [proxmoxservers] pve1 ansible_host=192.168.1.100 pve2 ansible_host=192.168.1.101 -
Tweak
templates/site-sudoers.j2to list your actual usernames and host aliases (so Ansible can template them correctly). -
Verify connectivity:
ansible all -m pingIf you see “pong” from each host, Ansible is golden.
-
Run the LDAP setup playbook:
ansible-playbook playbook-ldap-setup.ymlThis playbook will:
- Install and configure
libpam-ldapd,libnss-ldapd,nslcd. - Back up any existing
nsswitch.confor PAM files. - Deploy your custom
nslcd.conf,nsswitch.conf, and PAM snippets. - Start (and enable) the
nslcdservice.
If you only want to target a subset of hosts (e.g., the netservers), do:
ansible-playbook playbook-ldap-setup.yml --limit netservers - Install and configure
-
Run the sudoers playbook:
ansible-playbook playbook-site-sudoers.ymlThis will:
- Install (if needed) the
sudopackage. - Jinja-render
templates/site-sudoers.j2→/etc/sudoers.d/site_sudoers. - Enforce
0440permissions. - Validate syntax with
visudo -c.
- Install (if needed) the
-
Reboot or restart services (if needed). Typically, you don’t have to reboot after a PAM/NSS reconfiguration. A logout/login (or a quick
systemctl restart sshd nslcd) is enough. -
Verify on each host:
ansible all -m shell -a "getent passwd | grep <some-ldap-user>"
ansible all -m shell -a "sudo ls /root"
If these both work across your entire fleet, you can lean back and crack open a cold one.
Step 10: Profit (and Keep an Eye on It)
You should now be able to do the following on any machine in your inventory:
- SSH in as an LDAP-managed user (e.g.,
alice,bob, etc.). sudoif your group/alias is allowed.- Remove the constant worry of “did I remember to create that user on
linux-test-47?”
A Few Parting Tips
- Password Changes: If an LDAP user changes their password in Authentik, it should immediately propagate to all Linux boxes (assuming your flow is working).
- Group Management: Add or remove users from the
linux-usersgroup in Authentik to control who can log in. - Sudoers Tweaks: If you need a new command alias or want to tweak logging, just update
templates/site-sudoers.j2and re-runansible-playbook playbook-site-sudoers.yml. - Locking Down: If you want to restrict SSH to certain groups only, add in an
/etc/ssh/sshd_configAllowGroups linux-usersline (and restartsshd).
Conclusion
Setting up Linux SSO with Authentik + LDAP may feel like wrangling a herd of caffeinated cats at first, but once you’ve got the outpost, configs, and Ansible playbooks in place, adding a fresh machine to your homelab—or your data center-becomes just a bit easier.
Now go ahead: try to break it, file an issue, or brag to your colleagues that you no longer have to manually manage local /etc/passwd files on twenty boxes. You earned it.
Happy authenticating!